Last Saturday night I noticed that the NE Minneapolis Turkeys -- a flock of wild, dinosaur-like creatures that don't seem to care that they've inhabited an urban environment -- had paid a visit to our backyard.
turkey tracks: my hat for size reference
(and yes, this picture was taken mid-April in Minnesota)
Concurrent to this was my brainstorming over finger puppet ideas. I'll be a vendor at Johnstock again this year, and I wanted to offer some kind of smaller item to sell for $5 or so. With those footprints, puppet inspiration struck! It was almost too obvious, since the folks behind Johnstock itself have incorporated the famous fowl into their 2013 poster:
I spent an inordinate amount of brainpower on Sunday designing a turkey finger puppet pattern. Of course, there's easy ways to do it, but I wanted these puppets to look slightly better than what might be found in my son's take-home school folder. I also wanted the puppets to be able to "walk," since that's what the Northeast Minneapolis turkeys do in Northeast Minneapolis.
So, here's the fruits of my labors! I'll make as many of these as I can, and have them available for purchase at Johnstock on June 1st. In case you can't make it, or you'd rather just make a turkey or two yourself, here's the patterns and instructions.
You'll need:
felt -- red, yellow, and three different shades of tan or brown (or whatever color you want)
googly eyes -- I used 8mm, but anything 7-12mm will probably be fine
stuffing -- poly fill, cotton, small beans, whatever works
Tacky glue
hot glue (recommended but not absolutely necessary)
and your sewing arsenal of scissors, thread, needles, etc.
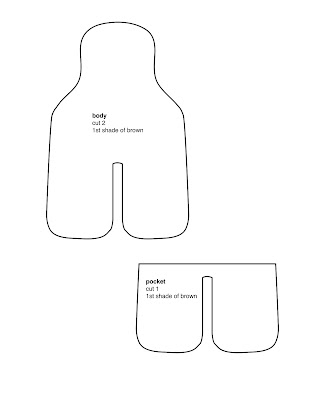
The following two images are the patterns. I designed them on 8.5 x 11" templates, so you should be able to just print them out:
The first thing to do is to sew the two body pieces together. There's no need to "turn" the pieces, so have the best sides facing out. Make sure to leave about an inch open on both of the legs.
Now stuff the turkey. Alternate between putting a little into each leg until it's evenly stuffed. You don't need it to be bursting at the seams, because then it won't "walk" -- a nice, even fill that keeps the turkey from drooping over is all you need.
Next, decide which side looks worse, and that'll be the back of the turkey. Line up the pocket onto the turkey's legs, and sew it on, leaving the entire top of the pocket (the long, straight line) open. Keep in mind that you're now sewing the bottom of the legs closed, so a few extra tight stitches along there will help prevent the stuffing falling out.
The body's sewn! Now you'll work on the face. Make sure to flip the turkey over, so that you're putting the face onto the front (non-pocket) side. With Tacky glue, glue the red waddle on there, and then glue on the yellow beak, slightly overlapping the waddle if you can. Glue two eyes (or one or three, depending on how eccentric your turkey is) where the eyes go. Plug in your hot glue gun right about now.
Put down the turkey and get those big circles you cut out of complementing shades of felt. With Tacky glue, glue the smaller of the two onto the center of the bigger one.
Get the turkey and flip it over so that you're looking at the back (pocket) side. As neatly as you can, put a line of hot glue along the back, from a little above the pocket to the middle of the turkey's head. Center the big circles on there -- making sure the smaller circle is facing out to the front -- and smush it onto the glue. Unplug your hot glue gun.
Put your fingers into the pocket and take your turkey for a test drive, because this turkey is done.
If you've made a walking turkey finger puppet, be sure to let me know! If you send pictures and permission to use them, I'll add them to this post.


